GBA Graphics, Part 3: Rotation, Scaling and Perspective
When Wario enters a level in Wario Land 4, he spins into a swirling vortex. The spiral is a single background and Wario a single sprite, both reusing the same tile artwork as they turn. The game animates their rotation, scale and position through graphics registers and OAM, while palette changes cycle the spiral’s colors.

Wario Land 4 was one of my favorite games as a kid, so it gets to open the last part of this series. Part 1 and Part 2 built the screen from layers and moved them by scrolling or changing their positions. This last part is about the backgrounds and sprites the GBA can rotate and scale. It explains why the numbers that do it seem backwards at first. Then it shows how F-Zero: Maximum Velocity changes them on every line to draw a road that disappears into the distance.
Backgrounds that rotate#
These rotation/scaling backgrounds are also called affine backgrounds, after the kind of transformation they apply. Which backgrounds are affine depends on the mode in DISPCNT:
| Mode | Regular backgrounds | Affine backgrounds |
|---|---|---|
| 0 | BG0, BG1, BG2, BG3 | none |
| 1 | BG0, BG1 | BG2 |
| 2 | none | BG2, BG3 |
The bitmap modes 3 to 5 from Part 1 draw their picture on BG2 with the same parameters, so a bitmap can be rotated and scaled as well. In some ways, an affine tiled background is simpler than a regular one:
- Its tiles always use 8 bits per pixel. Bit 7 of
BGxCNTmakes no difference. - Each map entry is a single byte, just a tile number. That limits the map to 256 different tiles, without flips or palette banks.
- The map is always square and stored row by row, without the blocks of 32 × 32 entries from Part 1.
- The scroll registers are ignored. The reference point described below takes their place.
The map size bits in BGxCNT mean something different, too:
| Map size | Pixels | Tiles | Map bytes |
|---|---|---|---|
| 0 | 128 × 128 | 16 × 16 | 256 |
| 1 | 256 × 256 | 32 × 32 | 1’024 |
| 2 | 512 × 512 | 64 × 64 | 4’096 |
| 3 | 1’024 × 1’024 | 128 × 128 | 16’384 |
For texel of a map that’s pixels wide, with map block and tile block from BGxCNT, the map entry, the start of tile and the byte holding the texel are this many bytes after the start of VRAM:
The vortex runs in mode 1 with only BG2 and the sprites switched on. Its BG2CNT of 0x5c82 gives BG2 priority 2, its tiles in block 0 and its map in block 28 at 0x0600e000. Map size 1 makes the spiral 256 × 256 pixels, so its map takes just 1’024 bytes.
From the screen back into the background#
The obvious way to rotate a picture is to take each of its pixels and work out where it lands on the screen. The GBA does the opposite. It draws the screen pixel by pixel like every other layer. For each pixel, it asks which texel of the background belongs there. Going this way round leaves no gaps: every screen pixel gets exactly one texel, however the background is turned or stretched. It also keeps the work fixed. Each line takes exactly 240 lookups, however large the background is or however far it’s shrunk. Moving on to the next pixel only takes an addition, as the registers below show.
The question is answered with 6 registers for each affine background. The reference point BGxX and BGxY is the position in the background that the top left pixel of the screen shows. From there, each step to the right adds PA across and PC down through the background, in units of 1/256 of a texel. Each step down to the next line adds PB across and PD down in the same units. With constant registers and mosaic off, screen pixel therefore shows the background at:
All 6 values count in 1/256 of a texel, so the texel is . The parameters are signed 16-bit numbers. BG2’s are BG2PA to BG2PD at 0x04000020 to 0x04000026, BG3’s start at 0x04000030. All of them are write only:
BGxPA to BGxPD
- Whole part, signed bits 8–15
- Fraction, in 1/256 bits 0–7
The reference point is a signed 28-bit number with the same 8 bits of fraction. BG2X is at 0x04000028, BG2Y at 0x0400002c, followed by BG3’s at 0x04000038 and 0x0400003c:
BGxX, BGxY
- Whole part, signed bits 8–27
- Fraction, in 1/256 bits 0–7
In the frame the demo below starts with, BG2PA is 96, or texels per pixel. BG2PC is -83, which the game writes as 0xffad. BG2X is 0x0003910, 14’608 in decimal or 57.06 texels.
Bigger numbers, smaller pictures#
Because the parameters say how far to move through the background per screen pixel, they work the opposite way to a zoom factor. Wario Land 4 shows this nicely before the title screen, where the Nintendo logo is an affine background that unfolds from a thin line:
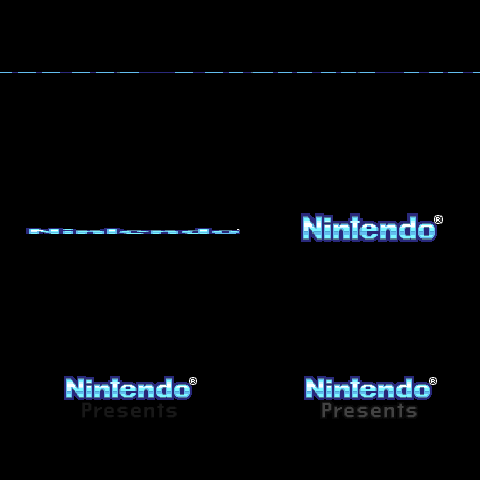
At one point during the animation, BG2PA is 124 and BG2PD is 2’048, while BG2PB and BG2PC are 0:
Each step to the right moves only 0.48 texels through the logo, so each texel spans about pixels. Each step down skips 8 rows, so only every 8th row of the logo is shown. The logo is drawn about twice as wide and at an 8th of its height. Every 4 frames, the game halves BG2PD, from 16’384 down to 256, while BG2PA slowly climbs to 256 as well. 256 means 1 texel per pixel, the logo’s normal size. Just before it gets there, BG2PD briefly dips to 204, which makes the logo a little taller than normal for a small bounce.
Rotating#
To show a background turned clockwise by an angle and magnified by , the parameters need the inverse of that transformation, multiplied by 256:
The game has to quantize these results to integers before writing the registers, so the stored transform is an approximation.
That frame has PA = 96 and PB = 83, which works out to an angle of and a magnification of . The spiral is drawn at twice its size.
GBATEK’s version of these formulas gives PB and PC the same sign. For a rotation with a positive, uniform magnification, they should be negatives of each other, as in the game’s values and the formula above.
The reference point decides what the picture rotates around. To keep background point at screen point , the formula above has to give exactly that point, which means:
Wario Land 4 keeps the spiral’s center (128, 128) in the middle of the screen at (120, 80). With PC = -83 and PD = 96, that’s exactly the game’s reference point:
Turn and zoom the spiral below. The outline on the map shows which part of the background ends up on the screen. Click a pixel or use the arrow keys to find the texel it shows:

Outside the background#
An affine background can end up showing parts that lie outside its map. Bit 13 of BGxCNT, wraparound, decides what happens there. If it’s set, the map repeats in every direction, so the coordinates simply wrap around at the map’s size. If it’s clear, everything outside the map is transparent and the layer behind it shows through. GBATEK notes that the bitmap modes ignore the bit:
The area overflow is ignored in Bitmap modes (BG modes 3-5), the outside of the Bitmaps is always transparent.
The vortex leaves wraparound off. At the roughly doubled size shown here, the screen only covers about 120 × 80 texels, so none of its corners is more than texels away from the spiral’s center. That’s inside the 256 × 256 map at any angle. Below a magnification of about 1.13, a corner can reach past the edge. Try it in the demo above.
To draw an affine line, x and y start at the line’s reference point. The mask handles wraparound because affine maps are always a power of 2 in size:
for dst in output.iter_mut() {
    let tx = ((x >> 8) as usize) & wrap_mask;
    let ty = ((y >> 8) as usize) & wrap_mask;
    x += matrix.pa;
    y += matrix.pc;

    if tx >= size || ty >= size {
        continue;
    }

    let Some((_, entry)) = bg
        .ctrl
        .map_entry(bg.kind, memory.vram, tx / 8, ty / 8, size)
    else {
        continue;
    };
    let tile_addr = bg.ctrl.tile_offset(entry.tile_number() as usize, depth);
    // ...
}
Without wraparound, wrap_mask is all ones. A negative coordinate then turns into a huge one when it’s converted to usize, so the same tx >= size check catches both edges.
Sprites that rotate#
Any sprite can be rotated and scaled as well. Bit 8 of its attribute 0 switches it on, which changes the meaning of a few other bits:
Attribute 0
- Shape bits 14–15
- 4 or 8 bits per pixel bit 13
- Blending, windows and mosaic bits 10–12
- Double size bit 9
- Rotation and scaling, set bit 8
- Y position bits 0–7
Attribute 1
- Size bits 14–15
- Matrix number bits 9–13
- X position bits 0–8
Bit 9 hides a regular sprite, but for an affine sprite it means double size instead, so an affine sprite can’t be hidden that way. The flip bits are gone as well. With an axis-aligned matrix, negating PA flips horizontally and negating PD flips vertically. For a rotated sprite, reflect its source image horizontally by negating both PA and PB, or vertically by negating both PC and PD. A negative diagonal value alone doesn’t imply a reflection: a 120-degree rotation has both PA and PD negative.
The matrix number picks 1 of 32 sets of PA to PD. They live in the 4th halfword of each OAM entry, which Part 2 skipped. Each matrix is spread across 4 entries, so matrix has PA at , followed by PB, PC and PD 8 bytes apart. They use the same format as a background’s parameters. Several sprites can share one matrix.
A sprite has no separate reference registers like a background. Its matrix maps around the center of its image and the center of its area on screen. For the pixel at from the center of that area, the texel of a sprite that’s pixels in size is:
A texel outside the sprite is transparent. The area itself doesn’t rotate, though. A sprite turned by 45 degrees needs more room than its own size, because a 64 × 64 sprite is pixels wide along its diagonal. Its corners would be cut off. Double size solves this by giving the sprite an area of . Its position then refers to the top left corner of that bigger area, so the sprite’s center moves to .
Wario in the vortex is OAM entry 0: a 64 × 64 sprite with 4 bits per pixel, double size and matrix 0. He starts several times larger than his original image and shrinks below its original size. Early on, he’s magnified so much that even the 128 × 128 area cuts off his edges. Rotate him below and switch double size off to see the corners disappear:
The sprite renderer reads the matrix from OAM and measures each pixel from the center of the area. For regular sprites, it uses the flip bits as before:
let (x, y) = if let Some(matrix) = matrix {
    let dx = col as i32 - (box_width / 2) as i32;
    let (tx, ty) = matrix.apply(dx, dy);
    let x = tx + (width / 2) as i32;
    let y = ty + (height / 2) as i32;

    let (Ok(x), Ok(y)) = (usize::try_from(x), usize::try_from(y)) else {
        continue;
    };

    if x >= width || y >= height {
        continue;
    }

    (x, y)
} else {
    attr.flip(col, row)
};
A new matrix on every line#
Part 1 explained that the screen is drawn one line at a time, with a short HBLANK after each one. Affine backgrounds take advantage of that. The formula from earlier describes the whole screen, but the hardware doesn’t evaluate it that way. It keeps an internal copy of the reference point and only adds to it, as GBATEK describes:
The above reference points are automatically copied to internal registers during each [VBLANK], specifying the origin for the first scanline. The internal registers are then incremented by dmx and dmy after each scanline.
dmx and dmy are GBATEK’s names for PB and PD. Within a line, the hardware adds PA and PC for every pixel. After the line, it adds PB and PD to the internal reference point. With constant parameters, that’s exactly the formula from earlier. If the game changes the parameters during HBLANK, though, every line can get its own scale and angle. Writing BGxX or BGxY also copies the new value into the internal register right away, which moves the start of the current line.
That’s how F-Zero: Maximum Velocity draws its track:
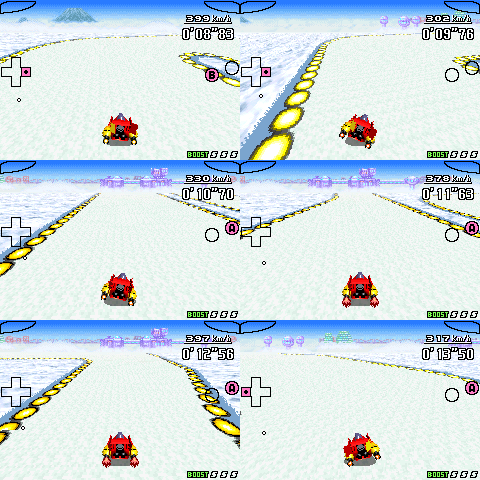
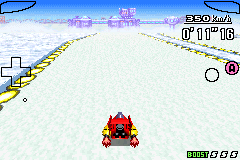
The top 32 lines are mode 0, with regular backgrounds for the sky and the mountains. At line 32, the game switches DISPCNT to mode 2, where BG2 is a 1’024 × 1’024 map of the track with wraparound on.
From line 33 on, every line gets new values from a table in memory. F-Zero sets up DMA channel 0 to copy 6 32-bit words at each HBLANK, starting at 0x04000020 and returning to that destination for the next transfer. Those 24 bytes contain BG2’s matrix, BG2X and BG2Y, followed by BG3’s matrix. The game therefore writes BG2’s reference point explicitly for each road line as well as changing its matrix.
The reference values in this frame also follow the recurrence of adding PB and PD after a line. Looking only at those values would make automatic stepping and explicit writes look the same. The DMA setup shows that the game supplies explicit writes as well.
Why the scale changes#
On a flat road seen from above, a line near the bottom of the screen shows a stretch of road close to the camera, so each pixel covers little of the map. Closer to the horizon, the same 240 pixels have to cover a much wider stretch further away. For a camera at height above the road, with the horizon at line , line shows the road at a distance proportional to . The distance the screen moves through the map per pixel grows the same way:
This is a simplified camera, not F-Zero’s code. Its values fit the curve closely, though, with and the horizon at , hidden behind the sky:
| Line | Texels per pixel | |
|---|---|---|
| 40 | 2.76 | 2.78 |
| 100 | 0.71 | 0.71 |
| 159 | 0.41 | 0.41 |
The vector points through the map as you move right across the screen, across the road. Its angle is nearly constant between lines, with small differences from integer rounding. A straight track doesn’t require PC to be 0; that depends on how the camera is oriented relative to the map’s axes. Pick a line below to see where it lies on the track. The outline approximates the screen’s footprint between the farthest line at 33 and the nearest at 159. The white lines mark every 8th line of the screen. They bunch up near the camera, where each line covers only a short stretch of the track. Transparent map pixels are dark here; on screen, they let the snow-colored backdrop show through wherever no other layer covers it:
Sly keeps the internal reference points next to the registers. It copies them from the registers at VBLANK, steps them after every line and also updates them when the game writes BGxX or BGxY:
/// Advances the internal reference points by PB/PD to the start of the next scanline.
fn step_reference_points(&mut self) {
    for i in 0..2 {
        let [_, pb, _, pd] = self.bg_matrix[i];
        self.bg_ref_internal[i][0] += pb.value();
        self.bg_ref_internal[i][1] += pd.value();
    }
}

fn reload_reference_points(&mut self) {
    self.bg_ref_internal = self.bg_ref.map(|point| point.map(ReferencePoint::value));
}
Back to the vortex#
Here’s how one pixel of the frame from the first demo gets its color. The pixel at (200, 30) is on the spiral, away from Wario:
-
With
BG2X= 14’608,BG2Y= 35’048 andPAtoPD= 96, 83, -83 and 96:Divided by 256, that’s texel (141, 83).
-
The map entry is at and holds tile 58.
-
The tile byte is at and holds palette index 3.
-
Palette entry 3 is
0x13ad, or (13, 29, 4). No sprite covers the pixel.BLDCNTselects a fade for every layer, butBLDYis 0 in this frame, so the color stays as it is.
The pixel ends up as (13, 29, 4), matching the color in the frame.
Wrapping up#
This series started with a single picture in VRAM and ended with a racetrack. In between, every pixel of the screen comes from the same few steps:
- Find the texel: A regular background scrolls its map, while an affine background or sprite walks through its image with a matrix. Bitmap BG2 can use that matrix too.
- Turn it into a color: The texel’s palette index selects one of the 15-bit colors in palette RAM, unless a bitmap already stores the color itself.
- Pick the winner: Priority, windows and blending decide which of the colors at that pixel reach the screen and how they’re mixed.
The tricky part for an emulator is timing. Games like F-Zero depend on register changes during the frame, so a renderer that uses only the final values loses their effects. Sly draws each visible line at HBLANK using the state for that line. That handles these changes between lines, but arbitrary changes within a line need finer timing. A renderer can also defer its work if it records enough history to reconstruct the state as the screen was drawn.
Thank you#
A big thank you to my friend Pdawg for reviewing all 3 parts of this series! He’s a fellow emulator developer and a very bright mind, I strongly encourage you to check out his work and drop him a follow :)
Another big thank you to Zayd for reviewing the series and giving me valuable feedback. He’s the creator of beanwii and also makes some really cool videos about emulation on his YouTube channel. If you enjoyed this series, go check them out!